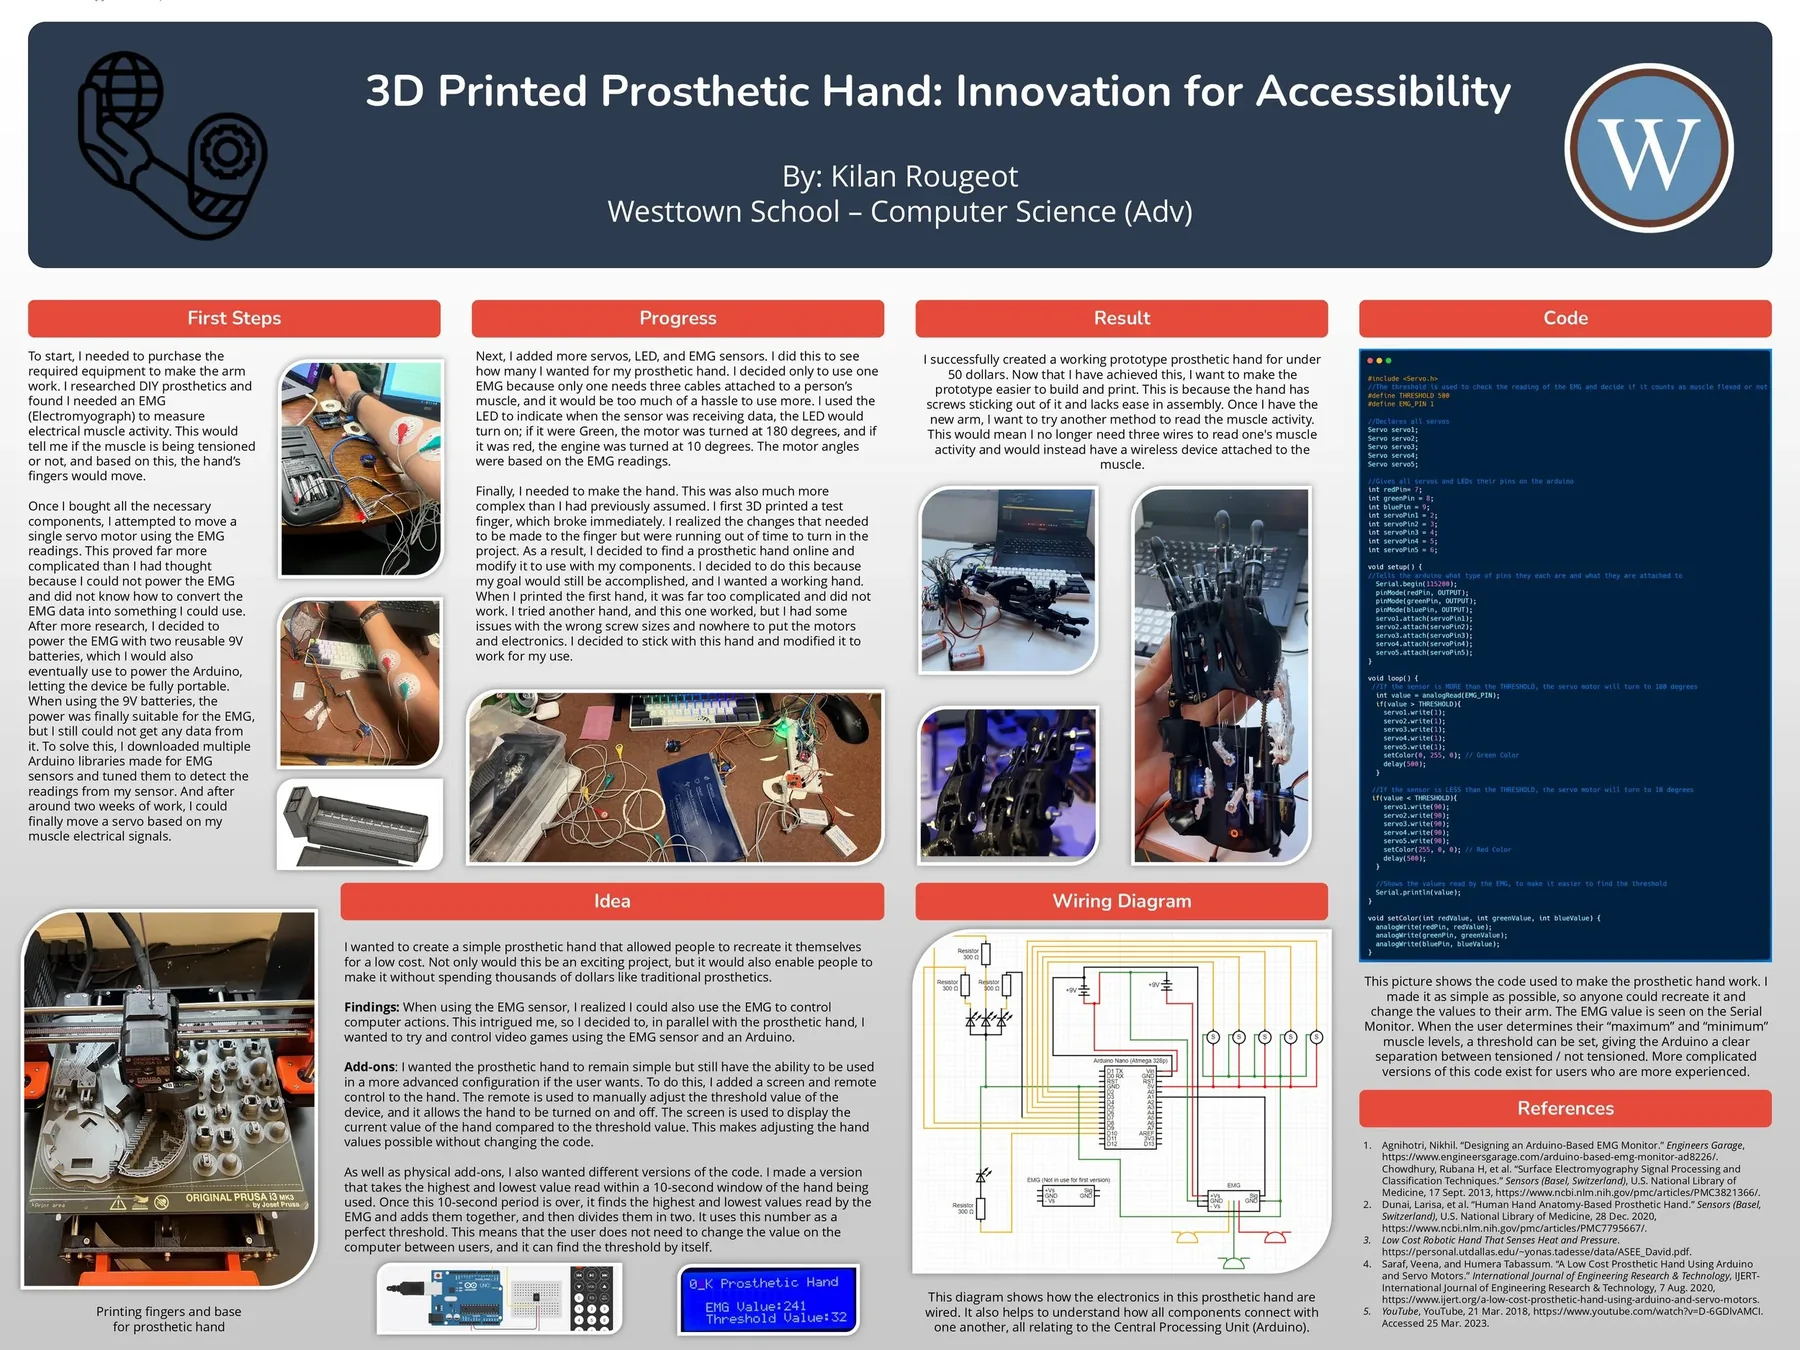
A working prototype prosthetic hand controlled by the electrical activity of the user's forearm muscle. One EMG sensor, an Arduino Nano, five servos, two 9V batteries and 3D printed parts, for a total of under $50.
Overview
I wanted a simple prosthetic hand that other people could build themselves for a low cost, instead of spending thousands of dollars on a traditional prosthetic.
To start, I needed to purchase the equipment to make the arm work. Researching DIY prosthetics, I found I needed an EMG (electromyograph) to measure electrical muscle activity. This tells you whether the muscle is being tensioned or not, and based on that the hand's fingers would move.
Build
The hand itself was much more complex than I had assumed. I first 3D printed a test finger, which broke immediately. I knew what changes the finger needed but was running out of time to turn in the project, so I decided to find a prosthetic hand design online and modify it to work with my components; my goal would still be accomplished and I wanted a working hand. The first hand I printed was far too complicated and did not work. The second one worked, but I had issues with wrong screw sizes and nowhere to put the motors and electronics. I stuck with this hand and modified it for my use.
Electronics and control
Once I had all the components, I attempted to move a single servo motor using the EMG readings. This proved far more complicated than I had thought: I could not power the EMG, and I did not know how to convert the EMG data into something usable. After more research I decided to power the EMG with two reusable 9V batteries, which I would eventually also use to power the Arduino, letting the device be fully portable. With the 9V batteries the power was finally suitable for the EMG, but I still could not get any data from it. To solve this I downloaded multiple Arduino libraries made for EMG sensors and tuned them to detect the readings from my sensor. After around two weeks of work, I could finally move a servo based on my muscle's electrical signals.
Next, I added more servos, an LED and more EMG sensors to see how many I wanted for the prosthetic hand. I decided to use only one EMG, because each one needs three cables attached to a person's muscle and more would be too much of a hassle. The LED indicates when the sensor is receiving data: green means the motor was turned to 180 degrees, red means it was turned to 10 degrees. The motor angles were based on the EMG readings.
The wiring diagram on the poster shows how the electronics are connected, all relating back to the central processing unit, an Arduino Nano (ATmega328P): the EMG sensor on an analog input, five servos on digital pins 2 to 6, an RGB LED through 300 Ω resistors on pins 7 to 9, and two 9V batteries for power.
Software
I made the code as simple as possible so anyone can recreate it and change the values to suit their arm. The EMG value is printed to the Serial Monitor; once the user determines their "maximum" and "minimum" muscle levels, a threshold can be set, giving the Arduino a clear separation between tensioned and not tensioned. More complicated versions of this code exist for more experienced users.
#include <Servo.h>
//The threshold is used to check the reading of the EMG and decide if it counts as muscle flexed or not
#define THRESHOLD 500
#define EMG_PIN 1

//Declares all servos
Servo servo1;
Servo servo2;
Servo servo3;
Servo servo4;
Servo servo5;

//Gives all servos and LEDs their pins on the arduino
int redPin= 7;
int greenPin = 8;
int bluePin = 9;
int servoPin1 = 2;
int servoPin2 = 3;
int servoPin3 = 4;
int servoPin4 = 5;
int servoPin5 = 6;

void setup() {
//Tells the arduino what type of pins they each are and what they are attached to
  Serial.begin(115200);
  pinMode(redPin, OUTPUT);
  pinMode(greenPin, OUTPUT);
  pinMode(bluePin, OUTPUT);
  servo1.attach(servoPin1);
  servo2.attach(servoPin2);
  servo3.attach(servoPin3);
  servo4.attach(servoPin4);
  servo5.attach(servoPin5);
}

void loop() {
 //If the sensor is MORE than the THRESHOLD, the servo motor will turn to 180 degrees
  int value = analogRead(EMG_PIN);
  if(value > THRESHOLD){
    servo1.write(1);
    servo2.write(1);
    servo3.write(1);
    servo4.write(1);
    servo5.write(1);
    setColor(0, 255, 0); // Green Color
    delay(500);
  }

 //If the sensor is LESS than the THRESHOLD, the servo motor will turn to 10 degrees
 if(value < THRESHOLD){
    servo1.write(90);
    servo2.write(90);
    servo3.write(90);
    servo4.write(90);
    servo5.write(90);
    setColor(255, 0, 0); // Red Color
    delay(500);
  }

  //Shows the values read by the EMG, to make it easier to find the threshold
  Serial.println(value);
}

void setColor(int redValue, int greenValue, int blueValue) {
  analogWrite(redPin, redValue);
  analogWrite(greenPin, greenValue);
  analogWrite(bluePin, blueValue);
}
Add-ons
Controlling a computer with the EMG
While using the EMG sensor, I realised I could also use it to control computer actions. In parallel with the prosthetic hand I used the EMG sensor and an Arduino to control video games.
Screen and remote control
I wanted the hand to remain simple but still be usable in a more advanced configuration if the user wants. To do this I added a screen and a remote control. The remote manually adjusts the threshold value of the device and turns the hand on and off; the screen displays the current EMG value compared to the threshold. This makes adjusting the hand possible without changing the code.
Self-calibrating threshold
As well as physical add-ons, I wrote different versions of the code. One version records the highest and lowest values read within a 10-second window of the hand being used, adds them together and divides by two, and uses that number as the threshold. The user no longer needs to change the value on the computer between users; the hand finds its own threshold.
Results
The result is a working prototype for under 50 dollars. Next I want to make it easier to build and print: the current hand has screws sticking out of it and is not easy to assemble. Once I have the new arm, I want to try another method of reading muscle activity, so that I no longer need three wires on the user's muscle and can instead use a wireless device attached to it.
What I learned
Getting a usable signal out of the EMG sensor took about two weeks of the project: powering it properly from the two 9V batteries and tuning existing Arduino EMG libraries to my sensor. The mechanical hand was the other surprise; my own test finger broke immediately, and adapting an existing design was what got a working hand finished before the deadline. Keeping the code simple, with the EMG value printed to the Serial Monitor to set the threshold, is what makes it possible for someone else to rebuild it.
References
- Agnihotri, Nikhil. "Designing an Arduino-Based EMG Monitor." Engineers Garage, engineersgarage.com/arduino-based-emg-monitor-ad8226. Chowdhury, Rubana H, et al. "Surface Electromyography Signal Processing and Classification Techniques." Sensors (Basel, Switzerland), U.S. National Library of Medicine, 17 Sept. 2013, ncbi.nlm.nih.gov/pmc/articles/PMC3821366.
- Dunai, Larisa, et al. "Human Hand Anatomy-Based Prosthetic Hand." Sensors (Basel, Switzerland), U.S. National Library of Medicine, 28 Dec. 2020, ncbi.nlm.nih.gov/pmc/articles/PMC7795667.
- Low Cost Robotic Hand That Senses Heat and Pressure. personal.utdallas.edu/
~yonas.tadesse/ .data/ ASEE_David.pdf - Saraf, Veena, and Humera Tabassum. "A Low Cost Prosthetic Hand Using Arduino and Servo Motors." International Journal of Engineering Research & Technology, IJERT, 7 Aug. 2020, ijert.org/a-low-cost-prosthetic-hand-using-arduino-and-servo-motors.
- YouTube, 21 Mar. 2018, youtube.com/watch?v=D-6GDlvAMCI. Accessed 25 Mar. 2023.